I use displacement maps to make my flags look real. The following tutorial will explain how to make a life like flag using Adobe Photoshop.
- First you need the ingredients. What you need is:
a) A Flag b) Silk texture
You can find both on Google; however, if you don't wanna bother, feel free to use these:
Silk, Pakistani Flag, US Flag - When you're all set, open the silk image and resize it to your desire.

- Next you want to convert the file into gray scale. You can do this by going to the File Menu -> Image -> Mode -> Grayscale. Go ahead and flatten the layers. After you're done, go back and convert it back to RGB. You do this by going to the File Menu -> Image -> Mode -> RGB. Press Ctrl+Shift+L to adjust the Auto Levels. This can be done manually by going to File Menu -> Image -> Adjustments -> Auto Levels. If the image looked kinda dark, this will fix that.

- Now you must create a duplicate of this image. You can do this by going to the File Menu -> Image -> Dupilicate. Convert the duplicated copy of the image into Grayscale again. Yes, I'm repeating a step in a way, but if you have any better ideas go ahead and suggest them to me.
- Now we want to give the image a little Gaussian Blur. We do this by going to the File Menu -> Filter -> Blur -> Gaussian Blur. I'm setting the radius to about 5.0 pixels. You can vary it if you choose to do so, just remember not to blur the whole thing out.

- So far, so good. Save this file as something like displacement.psd. You can do this by going to File Menu -> File -> Save As.... Close the file.
- Open the file with the flag. Press Ctrl+A to Select All of the image and copy it. Now go back to the RGB version of the silk image and paste the flag you just copied. Once copied, use Free Transformation (Ctrl+T) to make the image of the flag a little larger than the silk image. Once you're done with that, change the layer blending option to "Overlay" or if you prefer it a little less shiny, choose "Multiply". Your flag should look something like the one I have below.

- Now go to the File Menu -> Filters -> Distort -> Displace. Depending on the resolution of the image, set the Horizontal and Vertical scale. For this image, since the resolution is not a lot, I'm using the scale of 5 for both Horizontal and Vertical. After pressing Okay, Photoshop will ask you for the "displacement map". The file you saved earlier as displacement.psd will come into play now. Choose it and press Open.

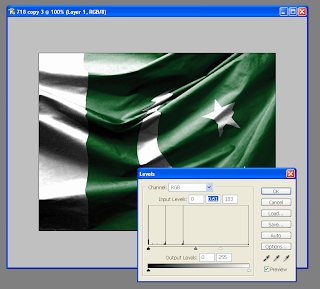
- Then you can adjust the levels if you like by pressing Ctrl+L. Once you're done with that, save the image in whatever format you prefer (I'd keep a PSD copy for myself), and you're done :)
 Here are two different images I created in the manner I explained above. The first is the Pakistani flag that we were working on above, and the second is the flag of the United States.


Here's a list of somewhat similar tutorials I found on the web: